

You don’t have to be in the education sector to conduct classes. Whether you’re a nonprofit providing education to those in need, a company with an internal training programme, or send experts to client sites, keeping track of class schedules and attendance on the Salesforce platform can grant you operational and analytic tools that your team will be grateful for.
If you have a spare hour, you can build a basic class scheduling system for Salesforce, using Isimio, in under an hour.
Installing Isimio
If you do not already use Isimio, start by installing the app onto your org. We recommend going through this guide in a fresh sandbox first, before migrating or repeating it on production. This is to secure your live data until you are completely happy with the results.
You can install Isimio from the AppExchange. There’s a free 30-day trial.
Once installed, Isimio will appear as an app. One of its tabs will be called Scheduler. Don’t open it just yet – first we have some objects to create!
Assumptions
In this guide, we will create a class model with ad-hoc attendance. This means the same people do not necessarily attend the same series of classes, rather that each class has its own attendance list and that people may come as they desire.
If you have set student rosters, you can wait until we cover the scenario in a future guide, or contact us.
Creating the Data Model
The beauty of Isimio is that it can work with your own data model. This means that you can create your own custom objects and fields – so feel free to deviate from this guide and add your own ideas. If you already have objects that are parallel to those in the guide, you are welcome to use them rather than create new ones.
To keep things fresh from our previous guide, we will use the Schema Builder to create our data model. It’s a wonderful tool that allows you to quickly create and change your data model. You can find the schema builder on the top-right corner of the Object Manager.

Check out our previous guide on holiday management for Salesforce for information on creating objects with the standard object forms.
Creating the Objects
In the schema builder, start by opening the Elements tab on the left, and drag a new Object to the grid.

The first object we’ll be creating is Class. In our example, we’ll set the name as an auto-number because we don’t want to name each individual session, but you may leave it as text if you wish. We also enabled reports and activities.

In addition to class, we will need two simple objects. One called Venue, and the second called Subject. Venue will contain a list of places where classes may take place, and Subject will list topics a class may be about (for example: Salesforce Administration or Employee Orientation). Leave the name field as text for both of these.
Lastly, we will want an object to track class attendance. Create an object called Attendance, where the name field is an auto-number with the format Attendance {0}, and enable reporting.

Adding the Fields
With the objects created, we’ll want to add some necessary fields. To create them, drag the correct field type from the Elements tab onto your object. You may add more, but the following should cover the basics for the Class object:
- Start Time (Date-Time, required): The time the class is expected to start
- End Time (Date-Time, required): The time the class is expected to finish
- Instructor (Lookup to Contact): The person leading the class
- Subject (Lookup to Subject): The topic taught in the class
- Venue (Lookup to Venue): The place where the class will take place
- Room (Text): The exact location within the venue where the class will take place
To the Attendance object, add the following fields:
- Class (Master-Detail to Class): The class to be attended
- Contact (Master-Detail to Contact, require Read Access instead of Read/Write): The person attending the class
- Attended (Checkbox): Whether or not the person attended the class
When you finish, your schema should look similar to this:

Adding Sample Data
Before we can schedule classes, we need to add some subjects and venues to our database. To do this, we’ll want to go to Setup and create some new custom tabs. Find “Tabs” in Setup and create two new tabs: one for the Venue, and one for Subject.

With the tabs created, you can use the App Launcher to open the lists, and create some sample records for venues and subjects.
Configuring Isimio
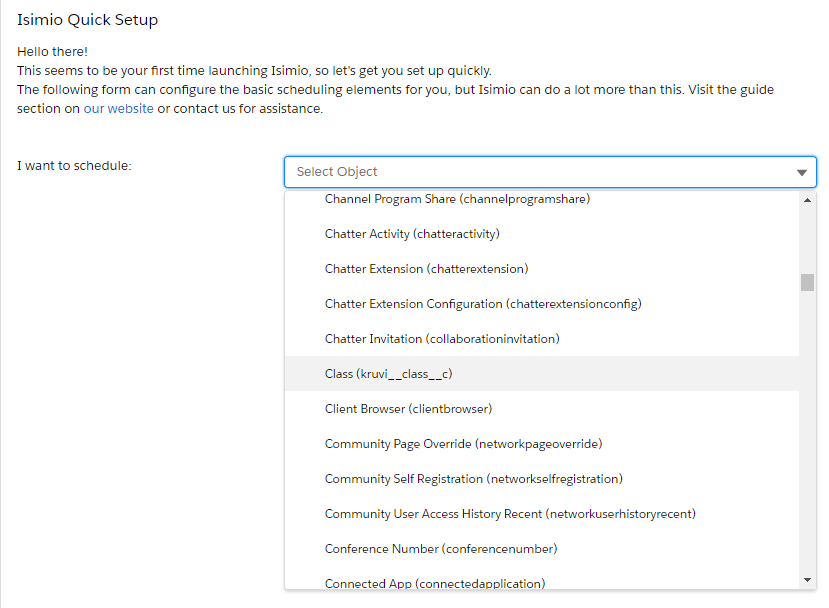
With the data model in place, we can begin to configure Isimio. Go to the Isimio app and open the Scheduler tab. When we enter the scheduler for the first time, we will be presented with the configuration wizard. The first step is to choose our new Class object from the list of objects in the system.
Click the dropdown and use your keyboard to type “Class” to easily find the object, or just scroll until you see it.
Once selected, we get a host of new options. I would like to view classes by subject, so I’ll pick that in the Group According To field. Because I don’t have that many, I’ll also tick the Preload All Parent Records option. If you have hundreds or thousands of subjects – first of all kudos – but also you may want to leave this option off.
Map the Start Time and End Time fields into the appropriate Start Time and End Time options. Now on the right side, add the instructor, subject, venue, and room fields to the Visible Fields list. To the Editable Fields list, add start time, end time, instructor, subject, venue, and room.
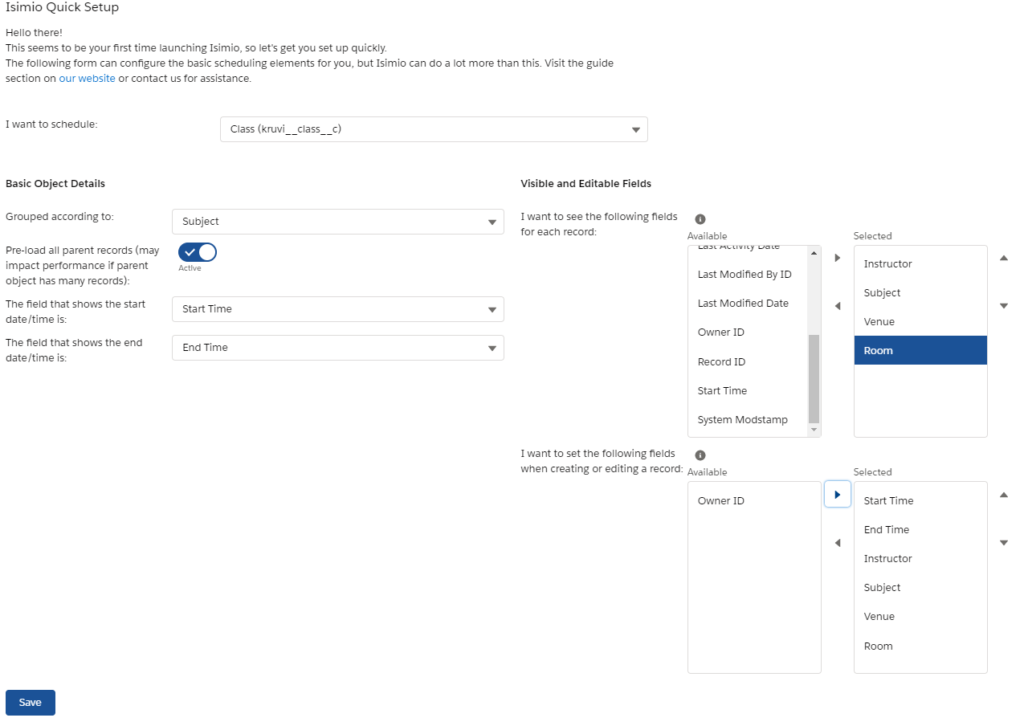
Hit the Save button when finished, and refresh the page. Isimio will reload with the list of subjects you’ve created (or whichever object you chose as the grouping):

Creating Classes
Although we are not quite finished, you are now able to create class records. Double-click or right-click on any empty square to see a form that would allow you to create a new class record. You should be able to select all the fields you’ve chosen in the configuration wizard, including the start and end times, the subject, instructor, and so on.
Try creating a sample record. Once it’s saved, right-click the box representing it and select Repeat. In the form that opens, select an end date, and leave only one day of the week checked, and save. This will clone your class record once a week, up until your chosen date!
You can also manually copy and paste records by using keyboard shortcuts (CTRL+C and CTRL+V), drag and drop records between days, or edit them by double-clicking.
Configuring Attendance
If you’ve made it this far, then you have successfully configured classes for Isimio. But this guide promised attendance, and this part is slightly more advanced – so refill your coffee and let’s go!
Configure Attendance Object
Attendance is a junction object connecting students to classes. As such, a list of attendees needs to be shown inside each class record. This is something that we can do outside the configuration wizard.
With Isimio Scheduler open, click the settings button (with the gear icon) and select Configuration. Right under the Active header, select Create New. In the object list, select Attendance. Mark the Active checkbox, and leave the rest with their default values. Hit the Save button when finished.

Add Attendance Fields
Find the Attendance object in the Active list and click it. At the bottom of the form there will be a link to add new fields. Add 3 fields as follows:
- Field: Contact
Editable: Yes
Load Order: 1 - Field: Attended
Editable: Yes
Load Order: 2 - Field: Class
Editable: No
Load Order: 3

When you’re finished, click Save, and Save again so that the scheduler refreshes.
Connecting Attendance to Class
The last step is to tell Isimio that Attendance is a child of Class. In Salesforce, find the Schedule Objects tab and click it. Change to the All list view, and find the record called Attendance__c. If your org has a namespace, the namespace will appear before Attendance__c.
Edit the record and set 2 fields:
- Parent Object = class__c
- Parent Relation = attendance__r
If your org has a namespace, you will need to place the namespace before either value, as per the screenshot.

Save the record and return to the scheduler. You may need to refresh the page for the new settings to take effect.
Congratulations! You are now finished configuring Isimio for classes. Despite the advanced configuration, we hope you found the process simple enough.
Back To The Scheduler
When you reload Isimio, you should face the same screen as before. I’ve created some test records, so it looks like this:

So what’s changed? Create a class record, and notice that we now have an additional tab for attendance records!

From here, you can create, edit, and remove attendance records related to each class. Add any number of contacts to attend your class, and after it finishes, tick the Attended checkbox for those who showed up.
Reporting the Results
From the App Launcher, open the Reports tab and create a new report. Select Classes with Attendance and Contacts as the report type.
In the report editor, add the interesting fields: class name, instructor, venue, and of course the contact’s (student) first and last name. Group the rows by the class’ start time, and the Attended checkbox field. I’ve added a chart for good measure, and here is the result:

Congratulations, you can now use Salesforce and Isimio for class management! If you have additional requirements, just contact us and we’ll be happy to assist. We also offer significant discounts for nonprofits.